1. 개요
NodeMCU 개발보드로 웹서버를 구동하다보면 하나의 웹페이지가 아니라 경우에 따라 다른 웹페이지를 보여주고 싶은 경우가 생길 것이다. 예를 들어 CCTV, 집안 온습도, 보일러 등등 조절하는 IoT 프로젝트를 하는 경우 CCTV 페이지에서는 CCTV 만을, 온습도 페이지에는 온습도만을 보여주는 작업이다.
1.1 준비물
- NodeMCU 개발보드(이 글에서는 NodeMCU v3)
- Micro 5pin USB
- 온습도 센서(DHT11)
2. 웹페이지 구성
이 글에서는 간단하게 웹페이지간 전환기능을 목적으로 각 페이지간 이동할 수 있는 하이퍼링크 태그만 있으며 그 외의 기능은 없습니다. 페이지는 총 3개로 메인페이지, 두번째페이지, 세번째페이지로 구성됩니다.
2.1 메인 페이지(주소 : /)
<!doctype html>
<html>
<head>
	<title>Main Page</title>
</head>
<body>
	<h1>This is Main page</h1>
	<p><a href="/">Main Page</a></p>
	<p><a href="/second_page">Second Page</a></p>
	<p><a href="/thrid_page">Thrid Page</a></p>
</body>
</html>
2.2 2번 페이지(주소 : /second_page)
<!doctype html>
<html>
<head>
	<title>Second Page</title>
</head>
<body>
	<h1>This is Second page</h1>
	<p><a href="/">Main Page</a></p>
	<p><a href="/second_page">Second Page</a></p>
	<p><a href="/thrid_page">Thrid Page</a></p>
</body>
</html>
2.3 3번 페이지(주소 : /thrid_page)
<!doctype html>
<html>
<head>
	<title>Thrid Page</title>
</head>
<body>
	<h1>This is Thrid page</h1>
	<p><a href="/">Main Page</a></p>
	<p><a href="/second_page">Second Page</a></p>
	<p><a href="/thrid_page">Thrid Page</a></p>
</body>
</html>
3. 소스코드
3.1 전체 소스코드
#include <ESP8266WiFi.h>
#include <ESP8266WebServer.h>

const char* ssid     = "Wi-Fi ID";
const char* password = "Wi-Fi 암호";

const char pageMain[] PROGMEM = R"=====(
<!doctype html>
<html>
<head>
	<title>Main Page</title>
</head>
<body>
	<h1>This is Main page</h1>
	<p><a href="/">Main Page</a></p>
	<p><a href="/second_page">Second Page</a></p>
	<p><a href="/thrid_page">Thrid Page</a></p>
</body>
</html>
)=====";

const char pageSecond[] PROGMEM = R"=====(
<!doctype html>
<html>
<head>
	<title>Second Page</title>
</head>
<body>
	<h1>This is Second page</h1>
	<p><a href="/">Main Page</a></p>
	<p><a href="/second_page">Second Page</a></p>
	<p><a href="/thrid_page">Thrid Page</a></p>
</body>
</html>
)=====";

const char pageThrid[] PROGMEM = R"=====(
<!doctype html>
<html>
<head>
	<title>Thrid Page</title>
</head>
<body>
	<h1>This is Thrid page</h1>
	<p><a href="/">Main Page</a></p>
	<p><a href="/second_page">Second Page</a></p>
	<p><a href="/thrid_page">Thrid Page</a></p>
</body>
</html>
)=====";

ESP8266WebServer server(80);

void handleMain() {
	String html = pageMain;
	server.send(200, "text/html", html);
}

void handleSecondPage() {
	String html = pageSecond;
	server.send(200, "text/html", html);
}

void handleThridPage() {
	String html = pageThrid;
	server.send(200, "text/html", html);
}

void setup()
{
	Serial.begin(115200);
	WiFi.mode(WIFI_STA);
	WiFi.begin(ssid, password);

	while (WiFi.status() != WL_CONNECTED) {
		delay(500);
		Serial.print(".");
	}
	Serial.println("");
	Serial.print("Connecting to ");
	Serial.println(ssid);
	Serial.print("IP address: ");
	Serial.println(WiFi.localIP());

	server.on("/", handleMain);
	server.on("/second_page", handleSecondPage);
	server.on("/thrid_page", handleThridPage);

	server.begin();
	Serial.println("Server started");
}
void loop()
{
	server.handleClient();
}
3.2 소스코드 설명
ESP8266WebServer 클래스를 사용하기 위해 Include 를 해줍니다.
#include <ESP8266WebServer.h>사용하는 Wi-Fi ID 와 암호를 입력해주는 부분입니다.
const char* ssid     = "Wi-Fi ID";
const char* password = "Wi-Fi 암호";
클라이언트 요청에 따라 보여줄 웹페이지 HTML 정보를 저장하는 문자열상수입니다.
물론 상수로 할 필요는 없으며 동적인 페이지를 위한다면 상수로 선언해서는 안됩니다.
const char pageMain[] PROGMEM = R"=====(.... 생략
server 이름의 80 번 포트로 ESP8266WebServer 객체를 생성합니다.
ESP8266WebServer server(80);클라이언트 요청에 대한 함수들로 html 문자열에 위에서 생성한 HTML 웹페이지 코드를 넣어주고 send 메소드를 통하여 클라이언트로 데이터를 전송해줍니다.
void handleMain() { // server.send(HTTP 응답코드, 전송내용 종류, 전송내용)
	String html = pageMain;
	server.send(200, "text/html", html);
}

void handleSecondPage() {
	String html = pageSecond;
	server.send(200, "text/html", html);
}

void handleThridPage() {
	String html = pageThrid;
	server.send(200, "text/html", html);
}
on 함수는 위에서 설명한 것과 같이 클라이언트의 요청에 따라 어떤 처리를 할 것인지 연결시켜주는 함수입니다.
	server.on("/", handleMain); // server.on(URL 주소, 처리함수)
	server.on("/second_page", handleSecondPage);
	server.on("/thrid_page", handleThridPage);
클라이언트의 요청이 있는 경우 클라이언트와의 연결과 요청에 대한 처리를 하는 함수입니다.
server.handleClient();3.3 요약 정리
1. ESP8266WebServer() 를 통하여 웹서버 객체를 생성
2. on() 를 통해 주소와 처리할 함수를 연결시
3. begin() 를 통해 웹서버를 시작
4. handleClient() 를 통해 클라이언트와 연결을 생성하고 요청을 처리
4. 결과
4.1 NodeMCU 개발보드의 "IP주소/"

4.2 NodeMCU 개발보드의 "IP주소/second_page"

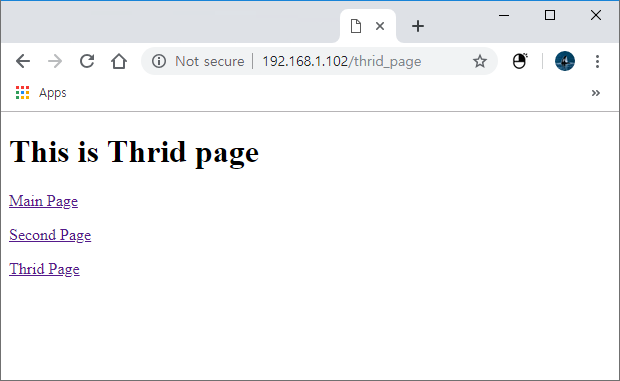
4.3 NodeMCU 개발보드의 "IP주소/thrid_page"

bugwhale.tistory.com/entry/nodemcu-esp8266webserver-class?category=839469
NodeMCU - ESP8266WebServer 클래스 사용하여 웹서버 구현하기
1. 개요 NodeMCU 개발보드로 웹서버를 구동하다보면 하나의 웹페이지가 아니라 경우에 따라 다른 웹페이지를 보여주고 싶은 경우가 생길 것이다. 예를 들어 CCTV, 집안 온습도, 보일러 등등 조절하
bugwhale.tistory.com


