오늘은 SD card reader에 대한 정보
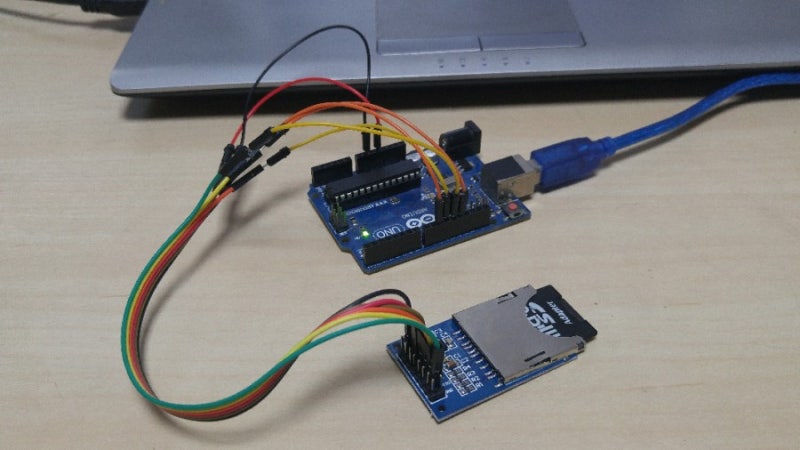
모양은 아래 처럼 생겼어요.~~
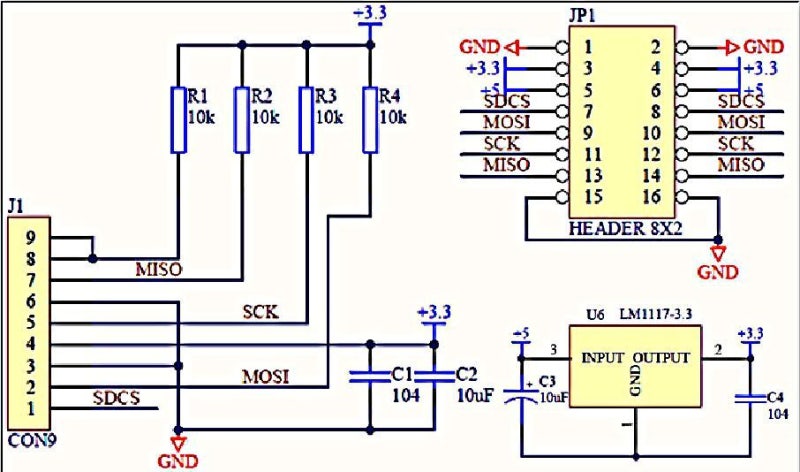
아래는 회로도인데 5v 에서 3.3 V 레귤레이터가 있어서 5V 와 3.3V interface에 같이 사용할수 있어요.
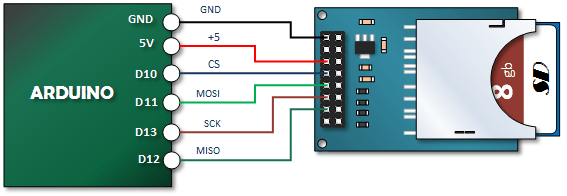
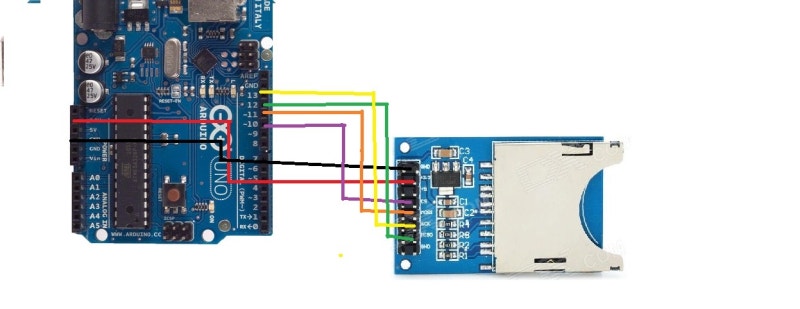
아두이노와 연결은 아래와 같이 합니다.
배선은 그렇게 어려운게 없죠.?
프로그램에 SD 카드 라이브러리를 사용합니다.
#include <SPI.h>
#include <SD.h>

File myFile;

void setup() {
  Serial.begin(9600);
  Serial.print("Initializing SD card...");

  if (!SD.begin(10)) {    // 10은 SD CS 핀입니다.
    Serial.println("initialization failed!");
    return;
  }
  Serial.println("initialization done.");

  if (SD.exists("example.txt")) {
    Serial.println("example.txt exists.");
  } else {
    Serial.println("example.txt doesn't exist.");
  }

  Serial.println("Creating example.txt...");
  myFile = SD.open("example.txt", FILE_WRITE);
  myFile.close();

  if (SD.exists("example.txt")) {
    Serial.println("example.txt exists.");
  } else {
    Serial.println("example.txt doesn't exist.");
  }

  Serial.println("Removing example.txt...");
  SD.remove("example.txt");

  if (SD.exists("example.txt")) {
    Serial.println("example.txt exists.");
  } else {
    Serial.println("example.txt doesn't exist.");
  }
}

void loop() {
}
SD.begin(10) 으로 SD를 엽니다.
SD.exists("example.txt") 으로 화일이 있는지 확인합니다.
SD.open("example.txt", FILE_WRITE) 화일을 엽니다 없으면 새로 생성합니다.
SD.remove("example.txt"); 화일을 삭제 합니다.
위의 예제 결과는 아래와 같습니다. 화일이 있는지 없는지 확인하고 생성 삭제 하는 예제입니다 .
Initializing SD card...initialization done.
example.txt doesn't exist.
Creating example.txt...
example.txt exists.
Removing example.txt...
example.txt doesn't exist.
아래 예제는 SD 카드의 정보를 보여주는 예제입니다.
#include <SPI.h>
#include <SD.h>

Sd2Card card;
SdVolume volume;
SdFile root;

const int chipSelect = 10;

void setup() {

  Serial.begin(9600);
  Serial.print("\nInitializing SD card...");

  if (!card.init(SPI_HALF_SPEED, chipSelect)) {
    Serial.println("initialization failed. Things to check:");
    Serial.println("* is a card inserted?");
    Serial.println("* is your wiring correct?");
    Serial.println("* did you change the chipSelect pin to match your shield or module?");
    return;
  } else {
    Serial.println("Wiring is correct and a card is present.");
  }

  Serial.print("\nCard type: ");
  switch (card.type()) {
    case SD_CARD_TYPE_SD1:
      Serial.println("SD1");
      break;
    case SD_CARD_TYPE_SD2:
      Serial.println("SD2");
      break;
    case SD_CARD_TYPE_SDHC:
      Serial.println("SDHC");
      break;
    default:
      Serial.println("Unknown");
  }

  if (!volume.init(card)) {
    Serial.println("Could not find FAT16/FAT32 partition.\nMake sure you've formatted the card");
    return;
  }


  // print the type and size of the first FAT-type volume
  uint32_t volumesize;
  Serial.print("\nVolume type is FAT");
  Serial.println(volume.fatType(), DEC);
  Serial.println();

  volumesize = volume.blocksPerCluster();    // clusters are collections of blocks
  volumesize *= volume.clusterCount();       // we'll have a lot of clusters
  volumesize *= 512;                            // SD card blocks are always 512 bytes
  Serial.print("Volume size (bytes): ");
  Serial.println(volumesize);
  Serial.print("Volume size (Kbytes): ");
  volumesize /= 1024;
  Serial.println(volumesize);
  Serial.print("Volume size (Mbytes): ");
  volumesize /= 1024;
  Serial.println(volumesize);


  Serial.println("\nFiles found on the card (name, date and size in bytes): ");
  root.openRoot(volume);
  root.ls(LS_R | LS_DATE | LS_SIZE);
}

void loop(void) {
}
root.ls(LS_R | LS_DATE | LS_SIZE); 이부분이 리스트를 보여주는 부분인데 LS_R 옵션은 하위 디렉토리의 내용까지 보여줍니다. 나머지들은 날짜와 사이즈를 보여줍니다. 아래는 실행 결과인데
MP3화일이 한글이라서 그런지 화일이 깨져서 보이네요.
Initializing SD card...Wiring is correct and a card is present.

Card type: SD1

Volume type is FAT16

Volume size (bytes): 997801984
Volume size (Kbytes): 974416
Volume size (Mbytes): 951

Files found on the card (name, date and size in bytes):
ENCFIL~1.MEN 2010-08-13 11:32:38 1232
⸮ν⸮-0~1.MP3 2003-05-01 12:02:26 9367552
⸮⸮⸮⸮⸮⸮~1.MP3 2003-05-01 12:02:38 5750784
⸮̽⸮ö~1.MP3 2003-05-01 12:03:00 9007104
⸮⸮⸮⸮⸮⸮~1.MP3 2003-05-01 12:03:20 9641984
⸮⸮⸮⸮(~1.MP3 2003-05-01 12:03:46 10043392
SG⸮⸮⸮⸮~1.MP3 2003-05-01 12:04:30 12036096
MICHAE~1.MP3 2003-05-01 12:04:02 6330368
VOS-01~1.MP3 2003-05-01 12:04:52 9598976
⸮⸮⸮⸮⸮⸮~1.MP3 2003-05-01 12:05:16 11229184
⸮⸮⸮⸮⸮⸮~1.MP3 2003-05-01 12:06:26 10149888
⸮⸮⸮⸮⸮~1.MP3 2003-05-01 12:05:38 9388032
⸮⸮⸮⸮⸮~2.MP3 2003-05-01 12:06:02 9682944
⸮⸮⸮⸮⸮⸮~2.MP3 2003-05-01 12:06:50 9742336
⸮⸮⸮⸮-0~1.MP3 2003-05-01 12:07:12 9558016
⸮⸮⸮⸮Ʈ~1.MP3 2003-05-01 12:07:34 8955904
⸮⸮ġȯ~1.MP3 2003-05-01 12:08:12 6848512
B3500_RE/ 2016-12-10 12:30:34 20161210/
  2016-12-10 12:32:08
    20161210.AVI 2016-12-10 12:32:12 7998036
    201612~1.AVI 2016-12-10 12:33:16 13719002
B3500_EV/ 2016-12-10 12:30:34
  20161210.AVI 2016-12-10 12:33:20 0
⸮⸮⸮⸮⸮⸮~1.MP3 2010-08-13 11:33:34 11184128
CIARA-~1.MP3 2010-08-13 11:33:38 4925440
PETER_~1.MP3 2010-08-13 11:33:44 4282368
⸮⸮⸮⸮⸮~1.MP3 2010-08-13 11:33:54 10115072
⸮⸮⸮⸮⸮~2.MP3 2010-08-13 11:34:04 10102784
SETTING/ 2016-12-10 12:30:34
  SETTING.DAT 2016-12-10 12:31:52 256
UPDATE/ 2016-12-10 12:30:34
  VERSION.TXT 2016-12-10 12:31:50 43
#include <SPI.h>
#include <SD.h>

File myFile;
void setup() {
  Serial.begin(9600);
  Serial.print("Initializing SD card...");

  if (!SD.begin(10)) {
    Serial.println("initialization failed!");
    return;
  }
  Serial.println("initialization done.");
  myFile = SD.open("test.txt", FILE_WRITE);

  if (myFile) {
    Serial.print("Writing to test.txt...");
    myFile.println("testing 1, 2, 3.");
    myFile.close();
    Serial.println("done.");
  } else {
    Serial.println("error opening test.txt");
  }

  myFile = SD.open("test.txt");
  if (myFile) {
    Serial.println("test.txt:");
    while (myFile.available()) {
      Serial.write(myFile.read());
    }
    myFile.close();
  } else {
    Serial.println("error opening test.txt");
  }
}

void loop() {
}
위의 예제는 화일을 열고 화일에 데이터를 저장하고 읽어서 Serial로 전송하는 동작을 수행합니다.
결과는 아래와 같이 화일를 생성하고 데이터를 저장하고 데이터를 읽어서 출력합니다.
Initializing SD card...initialization done.
Writing to test.txt...done.
test.txt:
testing 1, 2, 3.
SD card 사용하기
오늘은 SD card reader를 아두이노에 연결해 볼까 합니다 . SD card reader는 알리에서 구입했는데 어...
blog.naver.com


